Satellites

🌍 Hotbird The Premier Satellite for Broadcasting Across Europe and Beyond

Hotbird is one of the most widely used communication satellites for broadcasting television and radio channels across Europe, the Middle East, and parts of North Africa.

Since its launch in 1995, the Hotbird satellite fleet has played a significant role in providing a wide variety of content, including free-to-air, subscription-based channels, and internet services.

With its strategic orbital position and advanced technology, Hotbird has established itself as a leader in the satellite broadcasting industry.

🚀 On the subject of Hotbird

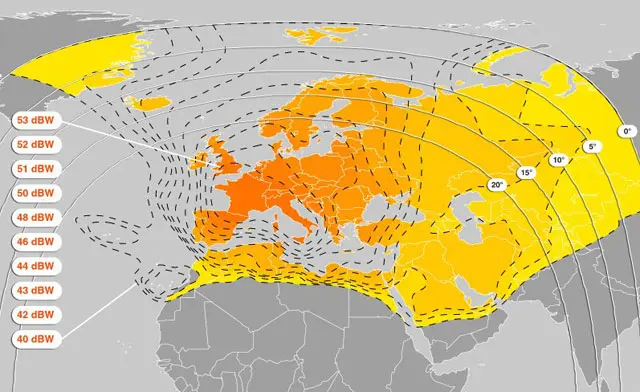
Hotbird is operated by Eutelsat, one of the world’s leading satellite operators. The Hotbird satellite fleet consists of multiple satellites, such as Hotbird 13C, Hotbird 13B, and Hotbird 13E, which are positioned at 13° East longitude. This prime location allows Hotbird to provide coverage across large parts of Europe, the Middle East, and North Africa.

Hotbird offers an extensive array of services, including:

  • Television channels: A variety of TV channels, including news, sports, entertainment, and educational programming.

  • Radio broadcasting: Both FM and satellite radio services.

  • Data and internet services: Reliable internet and communication links for businesses and individuals.

  • Corporate communications: Private communication channels for corporate and government use.

🌐 Hotbird’s Satellite Fleet

The Hotbird fleet includes several satellites positioned in the same orbital slot at 13° East, which gives it an exceptional ability to serve a large area of coverage.

Key satellites in the Hotbird fleet include:

  1. Hotbird 13B

  2. Hotbird 13C

  3. Hotbird 13E

  4. Hotbird 13F (Upcoming)

These satellites are equipped with high-powered transponders that deliver a wide range of services across the broadcast and telecommunication sectors.

🛰️ Frequencies and Services on Hotbird

Hotbird offers services through several frequency bands, including the Ku-band and Ka-band. These frequencies are used for different purposes:

  • Ku-band: The most common frequency for satellite TV and radio services. It offers high-quality transmission with smaller dishes and supports high-definition (HD) channels and internet services.

  • Ka-band: Used for high-capacity data services and satellite internet, offering faster speeds and lower latency.

Hotbird’s wide range of frequencies enables users to access hundreds of television channels, radio stations, and internet services across a broad area.

📡 How to Receive Hotbird Signals

To receive signals from the Hotbird satellite, users need a satellite dish that is properly aligned to the 13° East orbital position. The dish should be connected to a compatible receiver, which will allow the user to tune in to the correct frequencies.

Common Hotbird Frequencies:

  1. Hotbird 13C Frequency:

    • Frequency: 11.647 GHz (Horizontal)

    • Symbol Rate: 27500

    • FEC: 3/4

  2. Hotbird 13B Frequency:

    • Frequency: 12.722 GHz (Vertical)

    • Symbol Rate: 27500

    • FEC: 3/4

These frequencies are used for a variety of services, including satellite TV channels, radio stations, and data transmission.

For precise information on the frequencies and satellite settings, FreqSatellite is an excellent resource that provides updated details for users looking to tune their satellite systems to Hotbird’s services.

Hotbird is a major player in satellite broadcasting, offering wide-reaching coverage and reliable services across Europe, the Middle East, and North Africa. Its fleet of satellites provides a broad range of services, including television, radio, internet, and data transmission, making it a key player in the communication industry.

If you are looking to set up a satellite system to receive Hotbird signals or need the latest frequency updates, FreqSatellite offers the most comprehensive guides and settings for all your satellite needs.

Strategies to Improve Satellite Channel Reception

Ensuring strong and stable satellite reception requires proper alignment, high-quality equipment, and regular maintenance. Following the right strategies can significantly enhance your viewing experience and reduce interruptions.

1. Optimize Dish Alignment

  • Ensure the dish is precisely pointed to the satellite’s azimuth and elevation.
  • Use signal strength and quality indicators on your receiver to fine-tune alignment.
  • Make small adjustments slowly to achieve the highest stable signal.

2. Adjust LNB Skew Angle

  • Rotate the LNB slightly to match the satellite’s polarization.
  • Proper skew adjustment reduces interference and improves signal quality.
  • Check manufacturer recommendations for your satellite and location.

3. Use High-Quality LNBs and Cables

  • Low-noise LNBs provide better signal reception, especially for weak satellites.
  • Use well-shielded coaxial cables to prevent interference and signal loss.
  • Replace old or damaged cables promptly.

4. Keep Equipment Clean and Maintained

  • Remove dust, leaves, or snow from the dish surface regularly.
  • Check for loose connections and tighten F-connectors as needed.
  • Inspect for rust or physical damage and repair when necessary.

5. Avoid Obstacles and Interference

  • Ensure there are no trees, buildings, or other obstructions blocking the line of sight to the satellite.
  • Avoid placing the dish near devices that may cause electromagnetic interference.
  • Choose an elevated location if possible to maximize signal reception.

6. Regularly Monitor and Update Settings

  • Check signal indicators periodically to detect any drop in quality.
  • Update transponder lists and receiver firmware to maintain optimal performance.
  • Re-scan channels if you notice missing or weak channels.

Implementing these strategies ensures a strong, clear, and reliable satellite signal, providing uninterrupted access to your favorite channels and high-quality viewing experience.

How Satellites Enable Global Live Sports Broadcasting

Satellite technology is the backbone of global live sports broadcasting. It allows major sporting events—such as the
FIFA World Cup and the Olympic Games—to be transmitted in real time to millions of viewers across continents with high reliability and quality.

1. Capturing the Live Event

  • Multiple professional cameras capture the action from different angles inside the stadium.
  • Audio commentary, instant replays, and on-screen graphics are added in a production control room.
  • The final video feed is encoded into a compressed digital format suitable for satellite transmission.

2. Uplink Transmission to the Satellite

  • The encoded broadcast signal is sent from a ground station (uplink facility) to a geostationary satellite in orbit.
  • The satellite receives, amplifies, and shifts the frequency of the signal.
  • High-powered transponders ensure wide and stable coverage over large regions.

3. Downlink Distribution to Broadcasters and Viewers

  • The satellite retransmits the signal back to Earth across its coverage footprint.
  • TV networks receive the signal at their ground stations for redistribution via cable, terrestrial, or IPTV systems.
  • Home satellite dishes receive the signal directly for live viewing.

4. Maintaining High Quality and Low Latency

  • Advanced standards such as DVB-S2 and HEVC compression allow HD and 4K broadcasts with efficient bandwidth usage.
  • Redundant satellite links prevent interruptions during critical live moments.
  • Hybrid systems combine satellite and fiber networks to minimize broadcast delay.

5. Why Satellites Are Essential for Live Sports

  • Global reach without relying on local infrastructure.
  • Simultaneous transmission to multiple countries and languages.
  • Reliable performance even in remote or disaster-affected areas.

In summary, satellites make worldwide live sports coverage possible by rapidly transmitting high-quality video signals from stadiums to broadcasters and viewers everywhere, ensuring fans never miss a single moment of the action.

How to Check the Integrity of Cables and Connectors

The quality of your satellite signal heavily depends on the condition of cables and connectors. Damaged or loose connections can cause signal loss, poor picture quality, or intermittent reception. Regular inspection helps maintain stable viewing.

1. Inspect Cables Visually

  • Check for cuts, bends, or exposed wires along the entire cable length.
  • Look for signs of wear, corrosion, or water damage on outdoor cables.
  • Replace any damaged cables immediately to prevent signal degradation.

2. Check Connector Tightness

  • Ensure that F-connectors and other cable connectors are securely attached to the receiver and LNB.
  • Avoid over-tightening, which can damage threads or the connector itself.
  • Periodically unplug and reattach connectors to ensure proper contact.

3. Test with a Signal Meter

  • Use a satellite signal meter or your receiver’s signal quality indicator to test the signal.
  • Weak or fluctuating readings may indicate cable issues or poor connections.
  • Trace the cable to find any faulty section and replace if necessary.

4. Check for Interference

  • Ensure cables are routed away from electrical devices that may cause interference.
  • Use high-quality coaxial cables with proper shielding to minimize signal loss.

5. Maintain Regular Checks

  • Inspect cables and connectors periodically, especially before major events or important broadcasts.
  • Replace aging cables to ensure consistent signal quality over time.

By regularly inspecting and maintaining your cables and connectors, you can prevent signal issues, ensure stable reception, and enjoy uninterrupted access to satellite channels.

How to Identify New Satellite Frequencies Before Scanning

Staying updated with the latest satellite frequencies allows users to efficiently find and tune new channels without wasting time on trial-and-error scans. Knowing where to look ensures a smoother and faster channel setup.

1. Follow Reliable Satellite Websites

  • Use trusted sources that regularly publish updated frequency lists for various satellites.
  • Check for details such as frequency, polarization, symbol rate, and FEC for accuracy.
  • Subscribe to newsletters or feeds from satellite providers for real-time updates.

2. Use Satellite Receiver Tools

  • Many modern receivers include tools or apps to automatically fetch new transponder data.
  • Enable features like “Channel Update” or “Auto Transponder Scan” for automatic detection.
  • Keep your receiver firmware up to date to support these features.

3. Monitor Official Broadcaster Announcements

  • Follow official channels or social media accounts of broadcasters for announcements of new channels.
  • Note down the frequency and other parameters as soon as they are published.

4. Use Satellite Tracking Apps

  • Satellite tracking apps help identify which satellites are active in your region.
  • They often provide real-time frequency updates and footprints for better planning.

5. Keep a Personal Frequency Log

  • Maintain a record of new frequencies you discover or plan to scan.
  • Update the log regularly to avoid scanning the same frequencies repeatedly.
  • This helps you quickly access new channels as they become available.

By proactively identifying new satellite frequencies, users can save time, avoid missing new channels, and maintain a complete and up-to-date channel lineup.

How to Watch High-Definition 4K Channels

Watching 4K channels requires proper equipment, strong signal reception, and compatible content. Following the right steps ensures you enjoy ultra-high-definition quality without interruptions.

1. Use a 4K-Compatible Receiver

  • Ensure your satellite receiver supports 4K (Ultra HD) resolution.
  • Check the specifications for HEVC/H.265 decoding, which is commonly used for 4K broadcasts.
  • Update the receiver firmware to access the latest 4K channels and features.

2. Use a 4K-Capable TV

  • Connect your receiver to a 4K Ultra HD TV using HDMI 2.0 or higher.
  • Ensure the TV is set to display 4K resolution in its settings menu.
  • Enable HDR (High Dynamic Range) if supported, for better color and contrast.

3. Check Signal Quality

  • High-definition 4K signals require stronger and more stable reception.
  • Use signal quality indicators on your receiver to optimize dish alignment and LNB skew.
  • Ensure cables are high-quality and shielded to prevent signal loss.

4. Tune to 4K Channels

  • Use official satellite frequency lists to locate available 4K channels.
  • Perform an automatic or manual scan to add 4K channels to your receiver.
  • Organize 4K channels in favorites for easy access.

5. Ensure Sufficient Bandwidth

  • If your receiver uses IPTV or streaming features, ensure a stable internet connection with sufficient bandwidth for 4K playback.
  • HDMI and receiver settings should be configured for high frame rate 4K content.

By following these steps, you can enjoy crystal-clear 4K satellite channels, with vibrant colors, sharper images, and an immersive viewing experience.

How to Manage Live Broadcast Channels for Major Events

Live broadcasting of major events, such as international sports tournaments, concerts, or global ceremonies, requires proper receiver setup and awareness of channel updates. Managing these channels ensures uninterrupted access to live coverage.

1. Identify the Official Broadcast Channels

  • Check which channels hold the broadcasting rights for the event in your region.
  • Note their satellite, frequency, polarization, and symbol rate details.
  • Follow official websites or social media for real-time announcements.

2. Use Auto-Update and Network Scan Features

  • Enable your receiver’s auto-update or network scan to detect new channels automatically.
  • Perform a quick manual scan if channels are newly added or temporarily changed.

3. Optimize Signal Reception

  • Ensure the dish is properly aligned with the satellite transmitting the event channels.
  • Fine-tune LNB skew and check signal quality indicators for stable reception.
  • Use high-quality coaxial cables to avoid signal loss during important broadcasts.

4. Backup Channel Lists Before Major Events

  • Create a backup of your existing channel list to avoid losing settings during updates.
  • Restore the backup if any channels are accidentally removed or reorganized.

5. Organize Favorites for Quick Access

  • Add event channels to your favorites list for easy and fast access.
  • Remove duplicates or irrelevant channels to keep the list organized.

6. Monitor for Temporary Frequency Changes

  • Some broadcasters may use temporary transponders for live events.
  • Keep updated frequency information handy to quickly retune channels if needed.

Following these steps ensures seamless access to live broadcasts of major events, prevents interruptions, and allows viewers to enjoy high-quality, real-time coverage without technical issues.

How to Protect Your Satellite Receiver from Data Loss

Satellite receivers store important information such as channel lists, favorites, and settings. Protecting this data ensures uninterrupted viewing and saves time that would otherwise be spent on reconfiguring the receiver.

1. Regularly Backup Your Channel List

  • Use a USB flash drive to export channel lists and receiver settings.
  • Perform backups after adding new channels or changing settings.
  • Keep multiple backup copies in case one file becomes corrupted.

2. Update Firmware Carefully

  • Only install official firmware updates from your receiver manufacturer.
  • Ensure the power supply is stable during firmware installation to avoid data corruption.
  • Restart the receiver after updates and verify that your channels and settings remain intact.

3. Avoid Power Interruptions

  • Use a surge protector or UPS to prevent sudden power outages.
  • Do not unplug the receiver while it is saving settings or performing updates.

4. Handle USB Devices Carefully

  • Safely remove USB drives after backups to prevent corruption.
  • Use quality USB drives formatted in FAT32 or exFAT for compatibility.

5. Restore Data When Needed

  • Keep instructions ready for restoring channel lists and settings from backups.
  • After restoration, verify that all channels, favorites, and custom settings are working correctly.

By following these precautions, you can protect your receiver from accidental data loss, ensure stable channel reception, and maintain your personalized viewing experience.

One Comment

  1. Please add more details about beam coverage and signal strength. That would make the articles even better.

Leave a Reply

Your email address will not be published. Required fields are marked *

Back to top button